
Our relatively NEW Men’s Shed in Birmingham was fortunate to receive some grant funding, and among the considerable number of items we purchased from Axminster was a bandsaw (can’t recall the model number but it’s irrelevant anyway in respect of my comment). It wasn’t by any means the cheapest, but not a trade model either, and we know that you get what you pay for, and that Axminster is significantly more expensive than broadly similar models available from other suppliers of Chinese imports, or look-alikes!
All of that said, there is something we could all do to make even the most expensive machines that little bit better/more effective, and that relates to ensuring that the work-table is square to the blade, something I’m sure that everyone but me was/is aware of.
Some of our lads and lassies complained that using the adjustable fence was a waste of time, and positively injurious to the life of the blade. Why? because after the first few inches of a lengthy cut the blade began to bind and occasionally smoke would waft up from the wood.
We went through the workshop manual and tried just about everything we could think of and still smoking wood.
The other day, having realised that the first blade was just about useless, I fitted a new blade and in an idle moment, spent brushing some of the remaining dust from the cases, I thought to check whether the work-table was square to the bandsaw chassis. Not something that’s easy to accomplish, but given a good try square and a rule, a colleague and I managed it and found there to be a significant discrepancy. So, either the chassis was out of true, or the work-table (which I thought was pretty-much pegged to true by the three bolts securing it) was out of synch.
A little while later, belt fitted and everything back in place, we tried a test saw along a three foot plank. SUCCESS! OK, so we’re rank amateurs, but I wonder how many others have blamed the saw and the supplier/maker when it wasn’t … ?
Oh, and BTW, BIG thanks to Axminster’s technical blokes on the help desk for putting us straight about the problems we’d been having with the raising and lowering mechanism on the top blade support. Although we agreed the design could be a LOT better, we were sent a new gear and connecting bush and all will be well again very soon. So, while we (many of us) mutter and moan about pricing and the design and manufacturing standards of some of the gear, praise where it’s due!!!
HI Davey, I have a craft bandsaw and experienced some the problems you mentioned. I never expected too much performance as it was one of Axminsters cheaper models but it would be big enough for my needs. Two things over the past few months have helped. One was a you tube video " Bandsaw clinic with Alan Snodgrass". I followed his advice and my little bandsaw was buzzing along beautifully. Next was an attempt at bandsaw boxes, cuttin the curves caused stuck blades, whiffs of smoke etc and then I read a little more and found the optimum blade for curves was 4 teeth per inch 1/4" wide… Ordered one and the little machine cut through the laminated wood like a larger industrial machine. Table is held true resting on a bolt, which did need a little adjustment to bring it to square. I check it periodically. Rip fence is OK but I made my own Jig for perfect 90 degree cuts. Good luck with the bandsaw. Happy Turning
I had similar issues with a Jet 14" bandsaw. The misalignment was more than I could correct using the tracking knob.
First I aligned the fence with the mitre slot in the table.
Then I adjusted the tracking so that the blade was running on the crown of the wheels, equidistant from front and back face of the wheels.
Then I unbolted the table and, with a Bandsaw Buddy, aligned the blade with the fence.
It now works a treat.
Andrew
I have had my bandsaw for years and it never cut straight when using the guide fence, the cut would always wonder off. I have the yellow Perform CCBB II which comes with the quick release lever arm on the guide fence. Whereas the CCBB, I believe comes with a guide fence that has a locking knob. I found that the supplied manual does not explain very well on how to set the CCBB up properly and doesn’t even cover the the CCBB II’s guide fence that I have or how to adjust it. It wasn’t until I saw one of Axminster Tools’ YouTube videos about the principals on how to set a bandsaw up that I had better success.
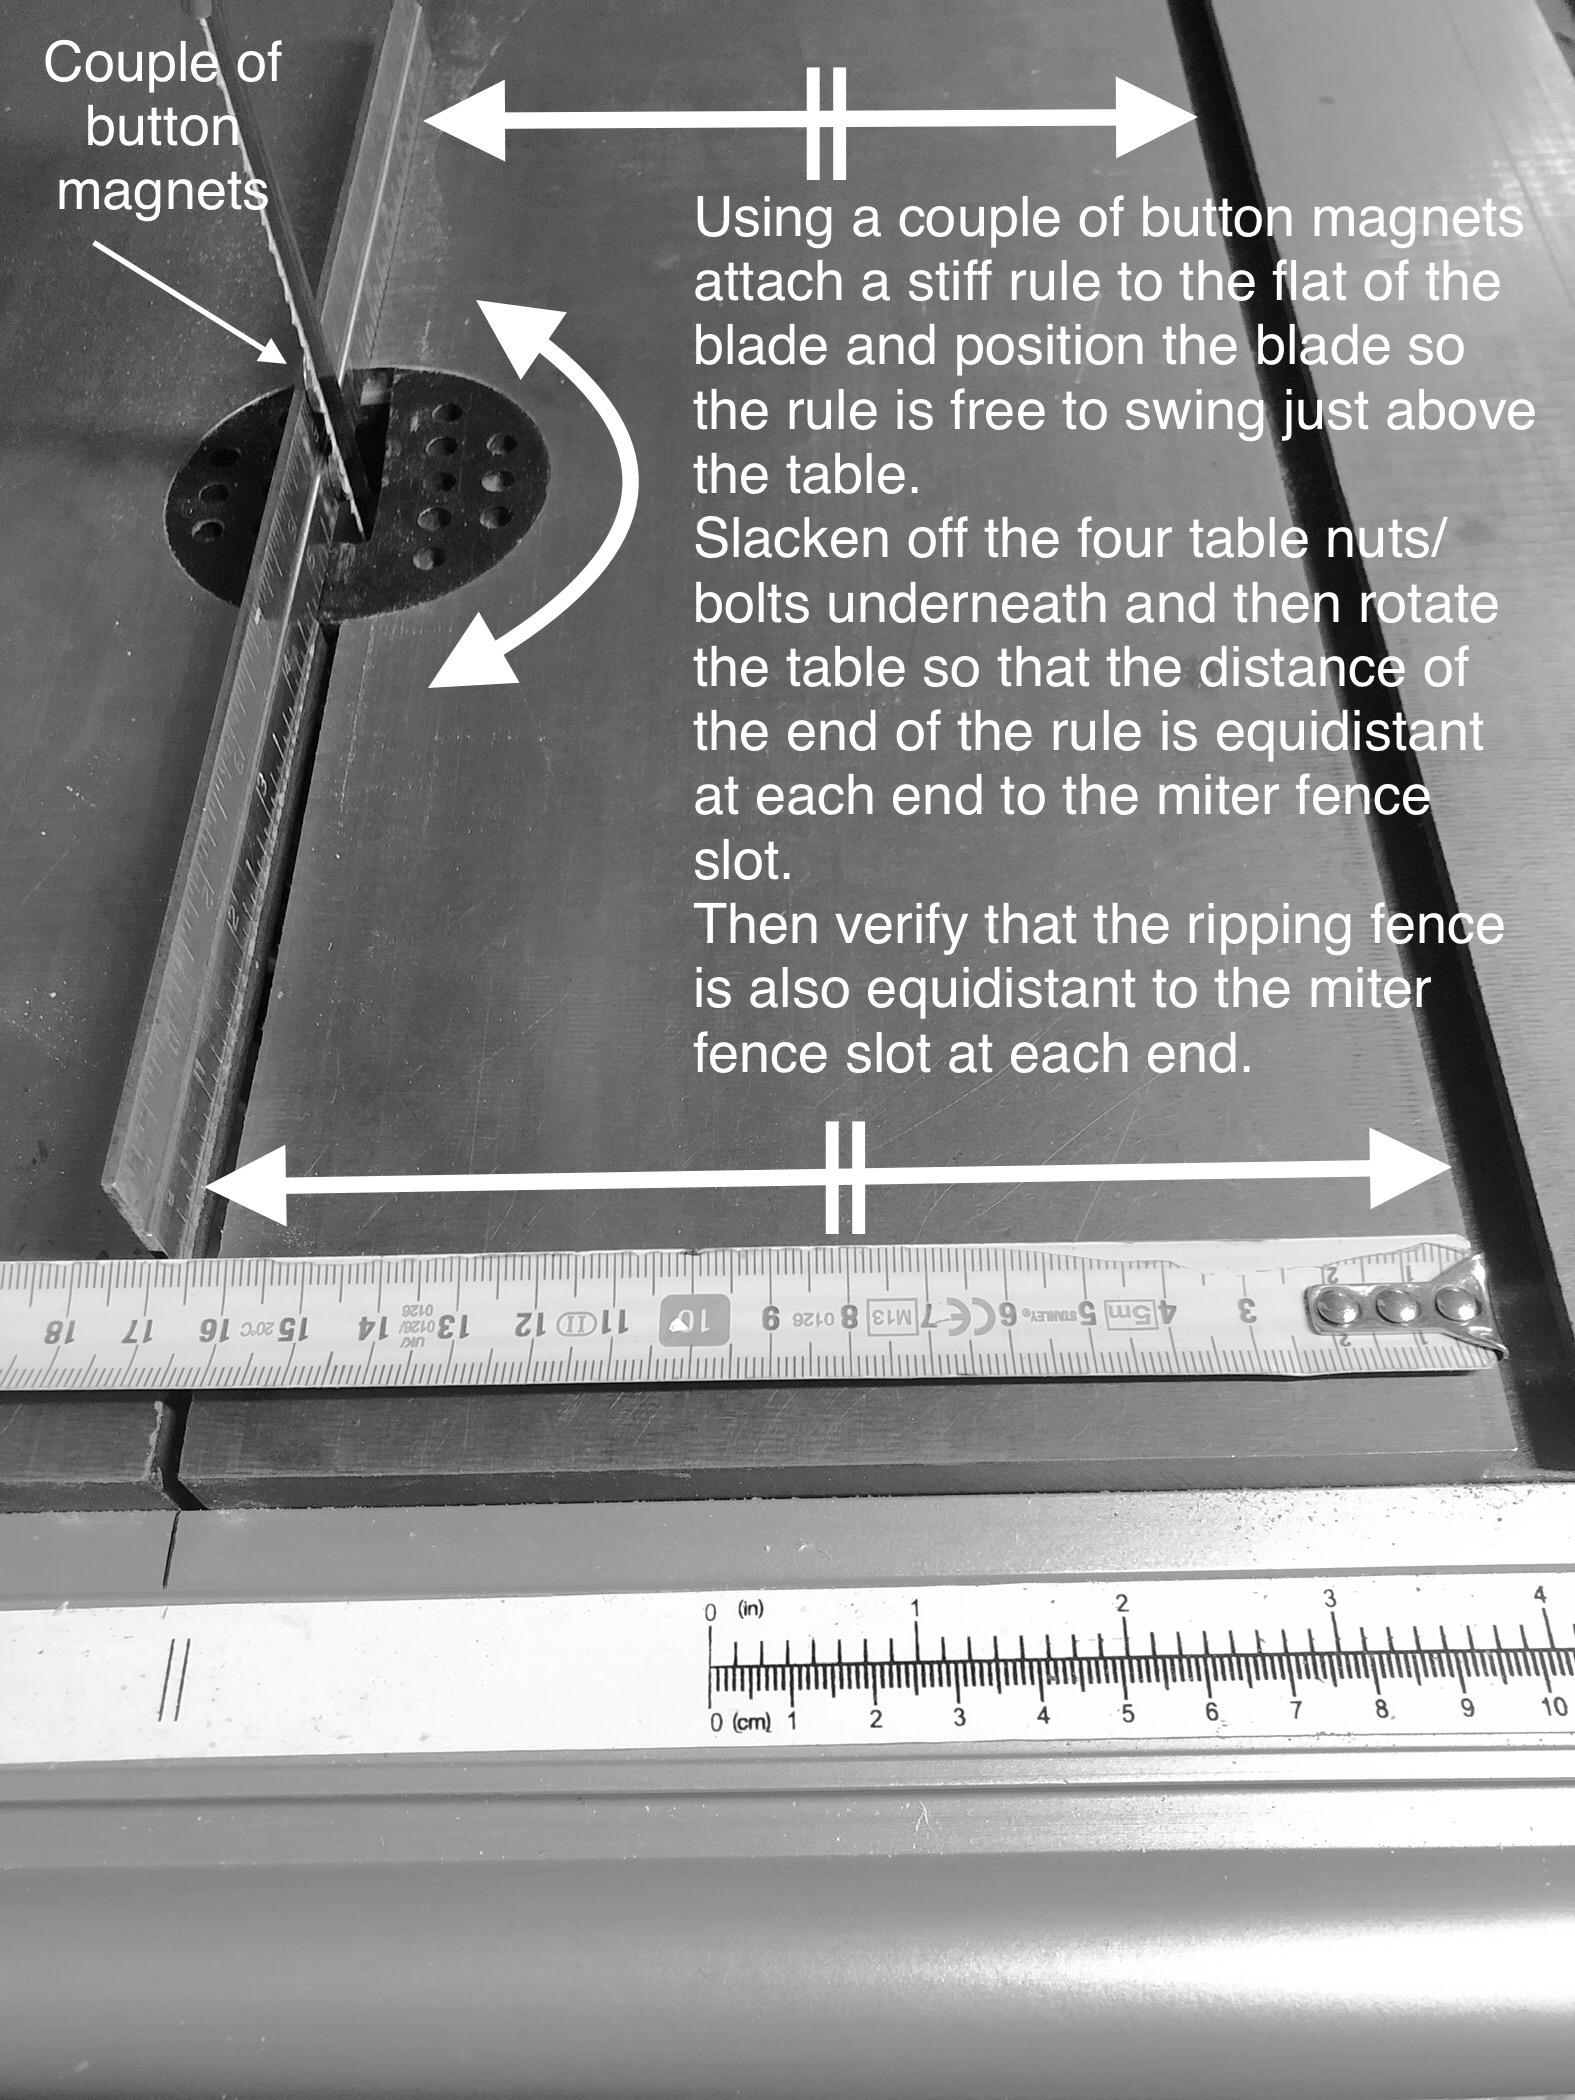
Having followed the video and after a bit more playing around with mine I now have it setup cutting super straight lines using the guide fence with no wondering off at all. It wonders off less than 0.1mm along the length of the cut. Essentially I found that you need to set the tables T-slot parallel to the blade. You can do this using Axminster Tools’ Bandsaw Buddy that they suggest in their video or as I did with a couple of thin round magnets on the blade behind the teeth and the ruler from my adjustable square. Ensure the ruler is straight first by looking at it along it’s length and laying flat on top of the saw table. Turning it over and checking both faces. I then adjusted my guide fence so that it is parallel with the table’s T-slot.
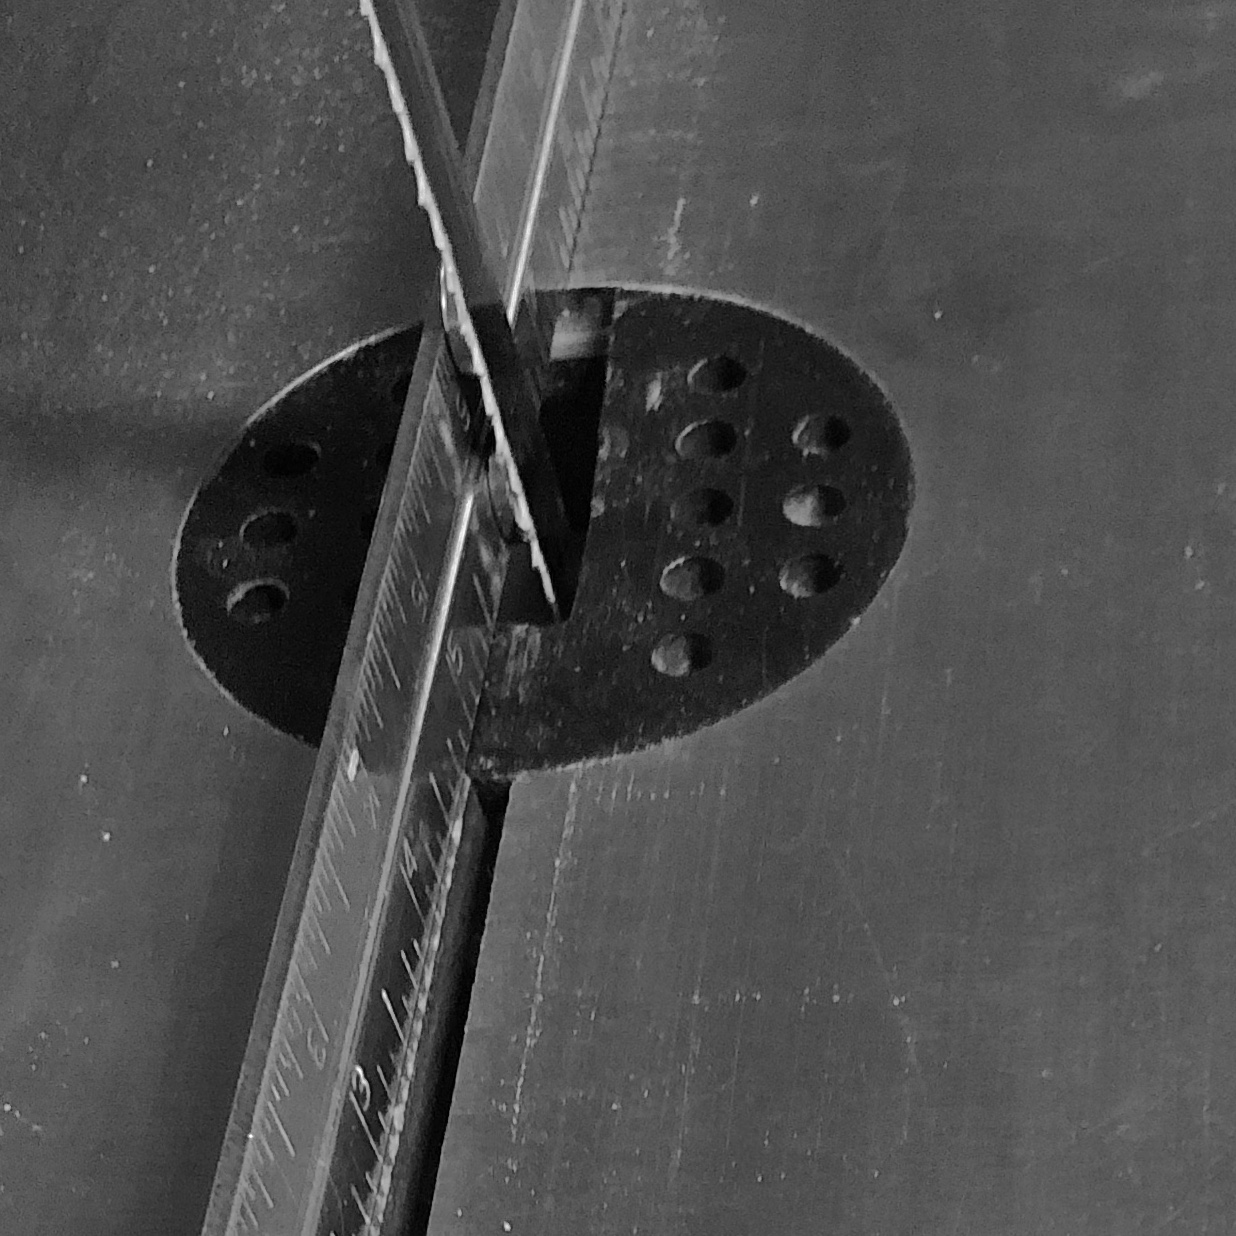
Assuming you have first setup the blade guides correctly first. Attached the ruler to blade with the magnets and make sure the blade is adjusted so the ruler floats above the table and free to swing.
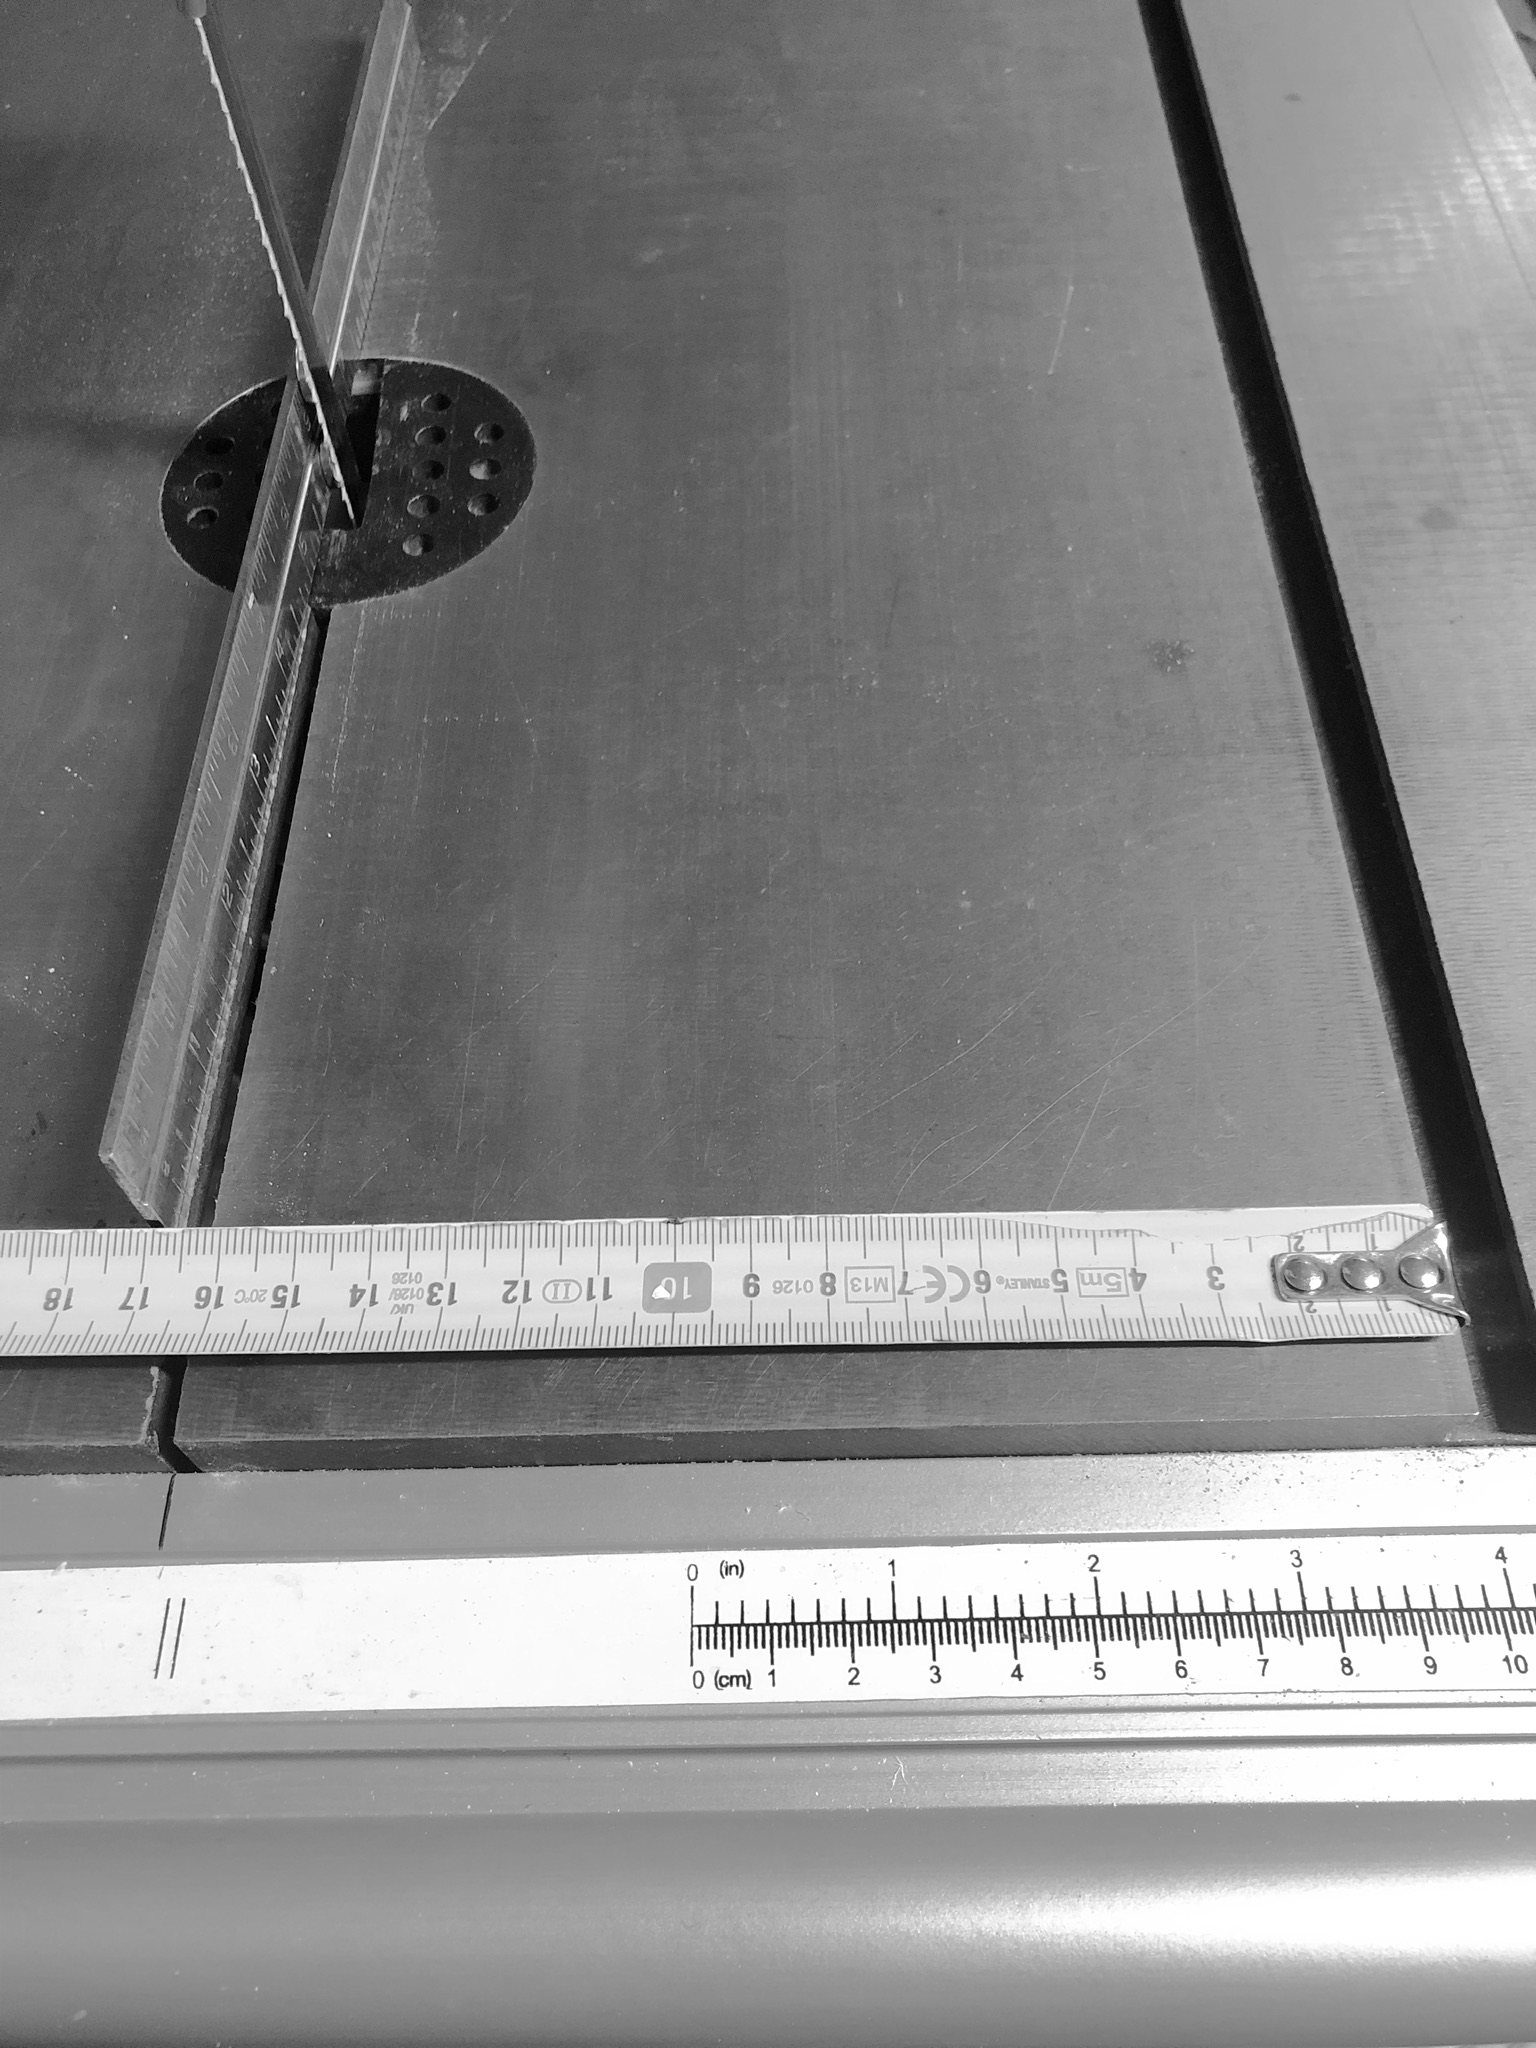
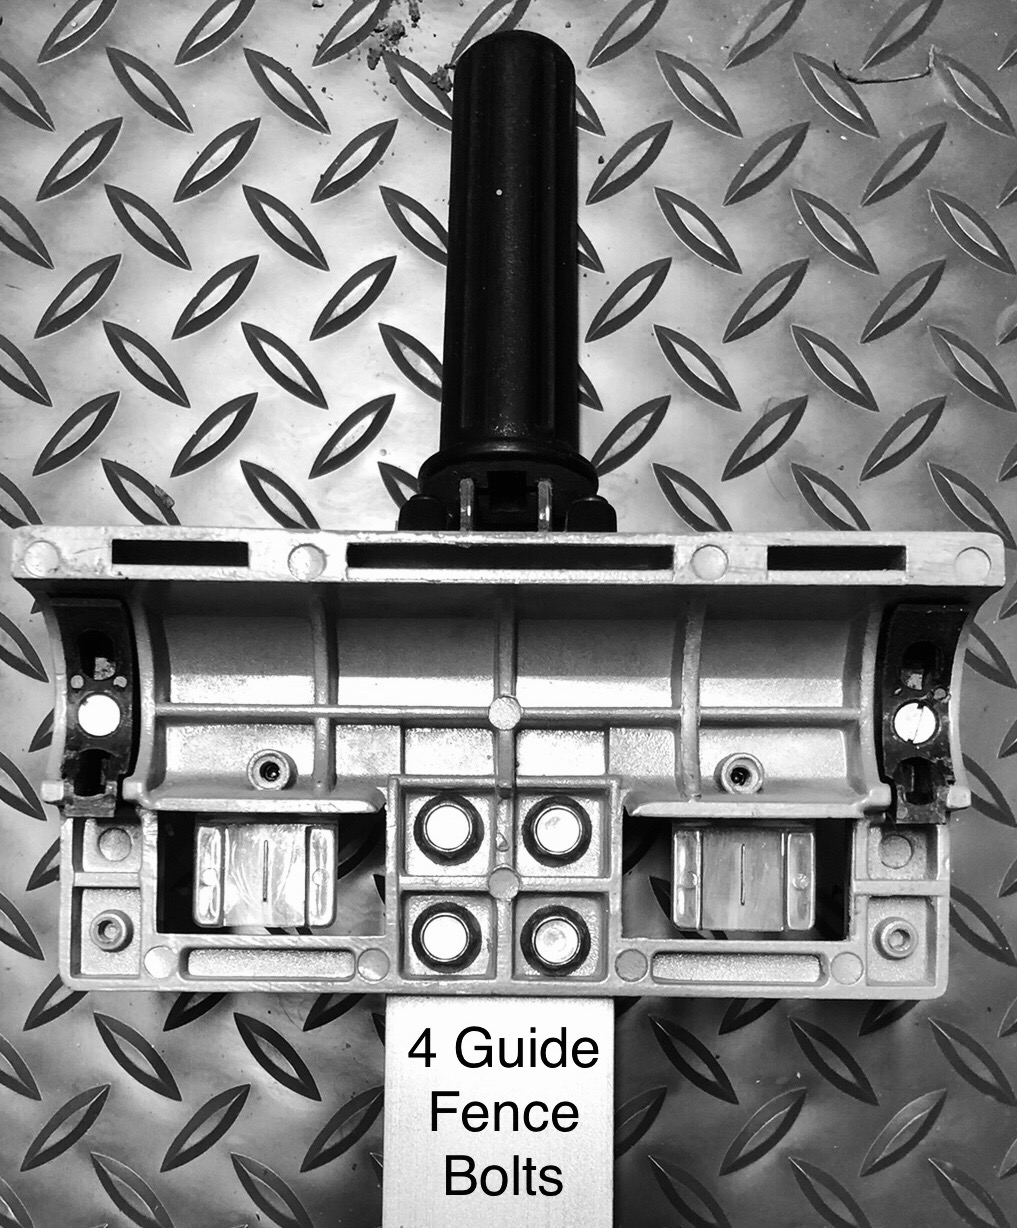
Measure the distance at each end of the ruler to the T-slot and rotate the table to reduce the difference in readings by using the slack in the 4 securing bolt holes underneath .
This deviates slightly from AT’s video, in that they set their guide fence parallel to the blade and don’t mention at all about adjusting the parallel accuracy of the T-slot to the blade. However, doing it my way the reading on my mitre fence is now more accurate too.
Because I don’t know which guide fence you have, I don’t know even if the guide fence that comes with the CCBB model can be adjusted independently to the tables T-slot position. If it can’t the only adjustment you do have is adjusting the tables position to the blade with the 4 securing bolts underneath the table.

These are the heads of the 4 bolts underneath my guide fence that you need to slacken off to adjust the fence. I replaced the 4 Allen head bolts with flange head bolts because I found the extra surface area under the head made it easier to adjust especially when tightening the bolts up.
I am really pleased with how my machine cuts now and wish I’d managed to sort this out a lot sooner.
I can highly recommend the Axcaliber Premium Blades from AT if they fit your machine. The varying pitch of the teeth cut very well. The one in my link below is for the size blade that fits my machine, yours maybe different.
I hope you find this information useful.
It’s great to hear that your Men’s Shed was able to receive grant funding and purchase equipment from Axminster, and that you were able to successfully troubleshoot an issue with the bandsaw. It’s true that even high-quality machines can experience issues if not properly maintained and calibrated. Checking and ensuring that the work-table is square to the blade is a crucial step in maintaining the bandsaw’s performance, and it’s great that you were able to track the root of the issue and fix it.
It’s also commendable that Axminster’s technical support team was able to assist you in resolving the issue with the raising and lowering mechanism on the top blade support. It’s important to acknowledge and give credit where credit is due, especially when a company’s customer support goes above and beyond.
The squareness or otherwise of the table to the blade doesn’t make the slightest difference: it’s just a flat surface on which to rest the wood. What does make the difference is the ensure that the blade (assuming it’s correctly set up) is dead parallel to the fence and also square to it. The Ax ‘Bandsaw Buddy’ may sound a bit of gimmick, but it’s absolutely indispensable for this little job as it then becomes very easy to adjust the fence accordingly.
I have a huge industrial Axminster bandsaw with a 230mm depth of cut. Once it’s correctly set up as described above and using a new 1/2" 3tpi blade, I have no difficulty in producing 200mm+ veneers on it.
Forget about the table alignment and concentrate on the blade/fence to ensure that they’re spot on. I also use three fences; the one supplied, a small one (shown in the pic) and a taller one that bolts on for really deep cutting.
You are correct in that table alignment to the table is not important, it’s more important to get the blade alinement to the fence to be parallel to get a straight cut. However, if you want a to use the miter fence it is important to get the blade running parallel to the tables guide slot and if you get this right you can align the guide fence to the same guide slot. Most reasonable machines guide fence can be adjusted so it lines up to the mitre fence slot.
This is how I get my table parallel to the blade,
And then on mine, slacken off the 4 bolts underneath the guide fence and adjust the it so that it’s parallel to the mitre slot and therefore also the blade. You need to ensure that the guide fence is parallel to the mitre’s guide slot when the guide fence is in its locked position on the table. When this is satisfied, remove the guide fence and lock the 4 bolts underneath. You may find that the guide fence moves after locking the 4 bolts underneath in which case you will need to repeat the process.
Doing it this way I can rip straight and cut accurate mitre cuts too.